Signed Silhouettes
Signed Silhouette observational drawing project:
Students will visually communicate through American Sign Language and Illustration. Students will learn about line, observational drawing, grid enlargement, tonal values, and how to create balance in a composition.
Students will visually communicate through American Sign Language and Illustration. Students will learn about line, observational drawing, grid enlargement, tonal values, and how to create balance in a composition.
Homework - Due Friday September 6th
Choose a short word to illustrate using a simple image and sign language. Begin to search and save images online. Save these in your gmail account in order to access and print in the computer lab the following week.
See the gallery below for samples and inspiration.


Step 1: How to draw what we SEE
Let's learn how to draw what we see... not what we think we see...


Materials:
Steps:
- Rolls of paper over tables (in order to observe our hands clearly)
- 8.5" x 11" paper - 10 sheets per student
- Pencil
- Pen
- Erasers
Steps:
- Draw a hand with no instruction.
- Reflection: Did your memory take over? Or were you able to actually draw from observation?
- How can we force our hand to draw what we see... not what we think we see?
- Blind Contour/Continuous Line - 3 studies
- Opposite hand - 3 studies
- Negative Space combined with continuous line - 1 study
Step 2:


Materials:
Steps:
- 8.5" x 11" paper - 3 sheets per student
- Pencil
- Erasers
- You Tube Video: https://www.youtube.com/watch?v=j739xyYn0fE
- During the video stop at 5:43 - check work
- Start video at 5:53
- End at 9:05
Steps:
- Prepare with a sheet of paper, pencil and one kneaded eraser.
- Follow along step-by-step with the teacher on the video.
- Turn-in at the end of the class-period.
Step 3:
Computer Lab Work - http://rocheart.weebly.com/uploads/3/2/1/2/32129237/directions_for_printing_silhouette_2018.pdf
- In the computer lab create a folder in your documents titled "Studio in Art".
- In that folder create a folder titled "sign language".
- Find an image of a silhouette on the internet that could represent the word you have chosen.
- Open the image first by clicking on "view image".
- Right-click on the image in order to "Save-as"
- Save your chosen silhouette as an image or a picture to your art folder.
- Once the image is saved properly in your folder you can Print out the silhouette as a 5" x 7" via our printing program.
- NOW... type out your word in Microsoft Word or Google Docs.
- Choose a font that you feel works with the image you have chosen.
- Enlarge your font size to approx. 350... You want each letter to be about half of a printed out piece of paper. Each font varies of course so view it on print preview to double-check.
- When font is chosen and size is chosen, save this document to your art folder.
- Print out your word with your chosen font.
Step 4: Drawing the hands in sign language
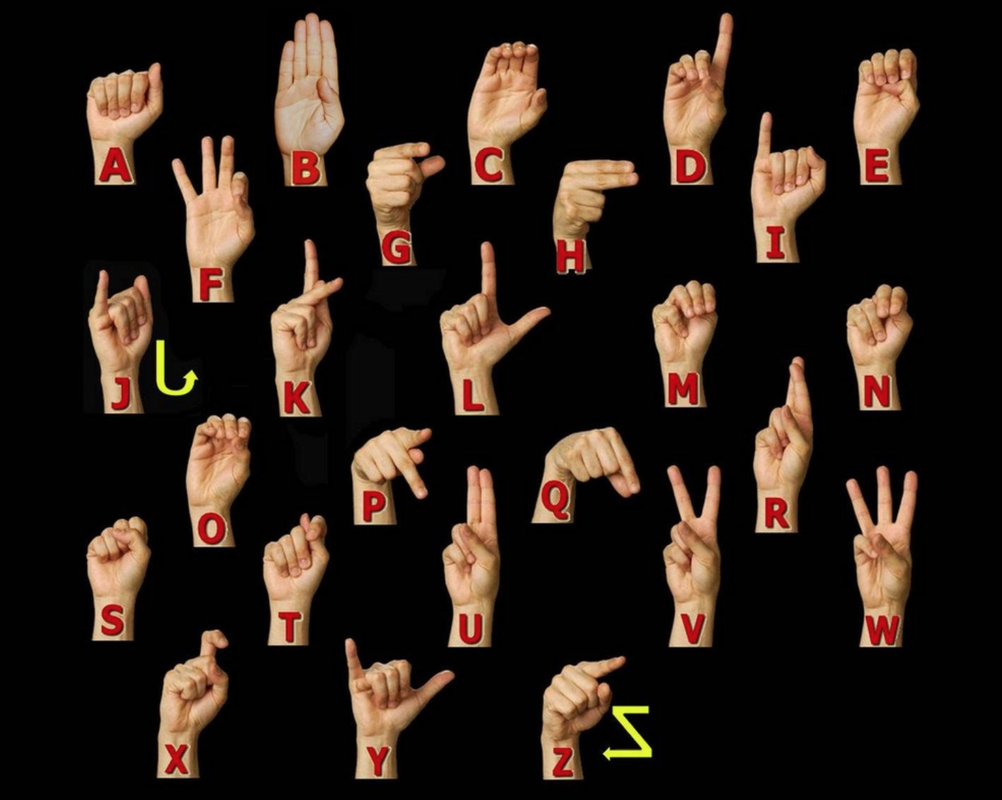


- Find the letters you need for your drawing.
- Practice drawing each hand (letter) on the sketchbook paper provided using pencil.
- Try to keep the size of each hand that you draw around 5" x 7".
- Keep it sketchy! It can be messy! This is not your final drawing.
- Once you get a well-drawn hand, trace it using the light box onto the "final paper" provided by the teacher. This is where you need to be NEAT.
- Go over your pencil lines on each "final" hand with thin sharpie.
- Keep your final drawn hands clean as we begin to prepare your final composition.
Step 5: Enlarging an image using a grid
|
Practice using a grid to draw using the following worksheet:
|
| ||
Creating your grid to enlarge your image onto your final paper
- Divide your 5" x 7" print-out using a ruler into a 1" x 1" grid.
- Label your 5" x 7" inch grid with letters and numbers.
- Take your final drawing paper (18" x 24").
- Create a 3" x 3" grid....
- Label your height and your width with numbers and letters on your border to match the smaller grid..
- Begin to draw, square by square. (Make sure you are holding the paper in the appropriate direction! Some silhouettes might be horizontal... others vertical...)
Step 6: Arranging your final composition
- Use your thicker sharpie to draw over the outline of your hand... not the interior contour lines! Outline only.
- Cut out your drawings of your hands very carefully... leave most of the black marker.
- Cut out your letters (not so carefully!) These can be cut into rectangles. You will be tracing the font through the paper.
- Place the letters and the hands around the inside of your silhouette until you feel you have an aesthetically pleasing and balanced composition.
- Trace each letter lightly.
- Trace each hand lightly.
- Put away the hands in your folder so that they remain safe.
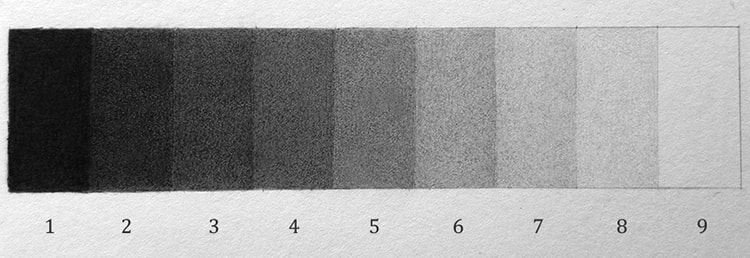
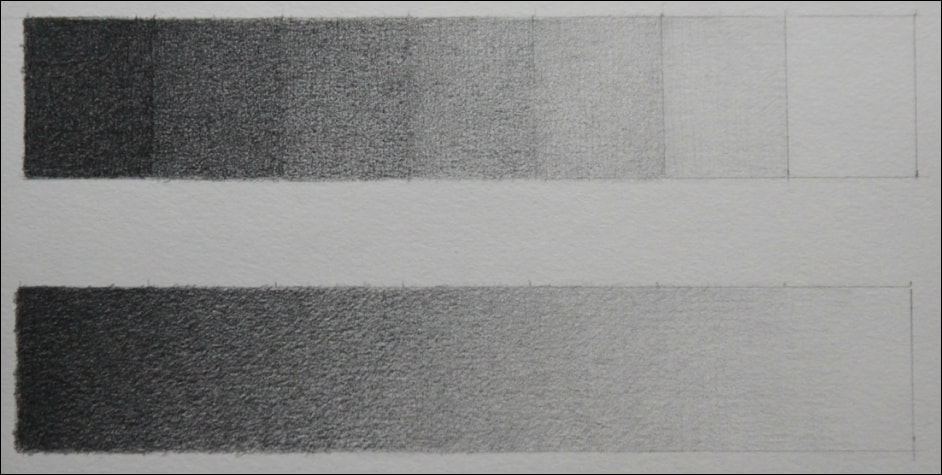
Step 7: Adding Value (Shading with pencil)